

A good outdoor kitchen pavilion really comes down to three things: a layout that puts your grill, sink, and fridge within a few steps of each other, a roof that actually gives your grill room to breathe, and seating that doesn’t leave guests bumping elbows. Nail those three, and the stone veneer and lighting are just the fun part. Here’s how to get each one right.

What is an outdoor kitchen pavilion?
An outdoor kitchen pavilion is a covered, open-air structure — usually timber-frame, sometimes steel or vinyl — built over a permanent outdoor cooking and seating area. Think of it as the roof that turns a backyard grill island into a year-round room: it keeps the rain off your countertops, gives you somewhere to hang lighting, and signals that this part of the yard is meant to be used, not just looked at. The pavilion and the kitchen island are really two separate design problems that have to work together, which is exactly where a lot of plans run into trouble.
How should you lay out an outdoor kitchen pavilion?
Treat it like a mini version of an indoor kitchen’s work triangle: your grill, your prep/sink area, and your fridge should each be a short reach from the other two, not crammed into one corner and not stretched across 20 feet of counter. Most builds land on one of three shapes:
- Straight run: simplest and cheapest, works for smaller patios, but everyone ends up standing in a line.
- L-shape: separates cooking from seating without eating up much yard, and it’s the shape you’ll see most often in pavilion kitchens.
- U-shape: wraps seating around the cook, great for entertaining, but it needs real square footage to avoid feeling cramped.
Whichever shape you pick, leave the cook a clear landing zone on both sides of the grill for plates and tools, and don’t let the bar overhang section eat into that workspace. For more layout options by yard size, see our outdoor kitchen layout ideas guide.

| Layout | Best for | Footprint needed | Typical seating |
|---|---|---|---|
| Straight run | Small patios, tight budgets | Smallest | 3–4 stools |
| L-shape | Most backyards | Moderate | 4–5 stools |
| U-shape | Big entertaining | Largest | 6+ stools |
How much clearance does a grill actually need under a roof?
This is the detail almost every pavilion kitchen plan gets wrong, and it’s the one that actually matters for safety. Most built-in grill manufacturers either set a strict minimum vertical clearance from the cooking grate to anything above it, or flatly say not to install the unit under any overhead combustible construction at all — meaning a wood pavilion roof sitting directly above the grill bay, with no hood and no real gap, is a problem from day one, not a someday-might-be-an-issue.
A few numbers worth planning around:

| Clearance type | Minimum distance | Notes |
|---|---|---|
| Side & back, unlisted grill (older NFPA guidance) | 36 in | From combustible materials |
| Front, unlisted grill (older NFPA guidance) | 48 in | From combustible materials |
| Overhead, grate to roof structure (common contractor practice) | 36–48 in | Treat as a floor, not a target |
| Overhead, several premium sealed-burner brands | Not permitted at any height | Unless paired with a compatible ducted vent hood |
Treat that 36–48 inch overhead figure as a floor, not a target — and remember some premium brands won’t certify any combustible material above the grill at all, at any height, without a compatible ducted vent hood.
The fix is straightforward: either leave the grill bay open to the sky, add a listed vent hood ducted through a non-combustible chase, or design the roof height over that one bay around your specific grill model’s spec sheet before you pour a single footing. Whatever you choose, check it against the cut sheet for the exact grill you’re buying — this isn’t a detail to eyeball. Our [built-in grill buying guide](/blog/built-in-grill-buying-guide) breaks down which models are rated for covered installation.
What counter height and stool spacing actually work?
Bar-height seating (42 inches) is the standard for outdoor kitchen islands, and it pairs with a more modest countertop overhang than people expect — about 12 inches is enough knee room at that height, though many builds go to 15–18 inches for extra comfort. Just know that anything past about 14 inches of unsupported overhang in stone veneer usually needs a steel angle or corbel underneath it, or you’re looking at cracked veneer down the road.
For the seating itself, plan on roughly 24 inches of width per stool and at least 36 inches of clear space behind anyone sitting down — bump that to 44 inches if people will be walking behind the bar while others are seated. Skip this and you end up with a beautiful bar nobody can actually sit at comfortably.
| Counter height | Overhang (knee room) | Width per seat | Clearance behind seating |
|---|---|---|---|
| 30 in — table height | 18 in | 24 in | 36 in (44 in if there’s a walkway) |
| 36 in — standard counter | 15 in | 24 in | 36 in (44 in if there’s a walkway) |
| 42 in — bar height | 12 in | 24 in | 36 in (44 in if there’s a walkway) |
What materials and structural details should you plan for?
Stone veneer over a CMU block or framed structure is the standard build for outdoor kitchen islands, and for good reason — it’s durable, weather-resistant, and reads as substantial rather than thrown-together. A few things worth confirming with your contractor before the build starts:
- Any countertop overhang beyond roughly 12–14 inches needs engineered support (steel angle, corbel, or a thickened bond beam), not just thin-set mortar holding the veneer.
- Weep screeds and proper flashing matter even outdoors — trapped moisture behind veneer is one of the most common (and most avoidable) outdoor kitchen failures.
- Keep refrigeration units a manufacturer-specified distance from heat sources like the grill; running them side by side without that gap shortens the compressor’s life.
If you’re still deciding on a finish, our guide to stone veneer for outdoor kitchens compares the common options by cost and maintenance.
How much does an outdoor kitchen pavilion cost?
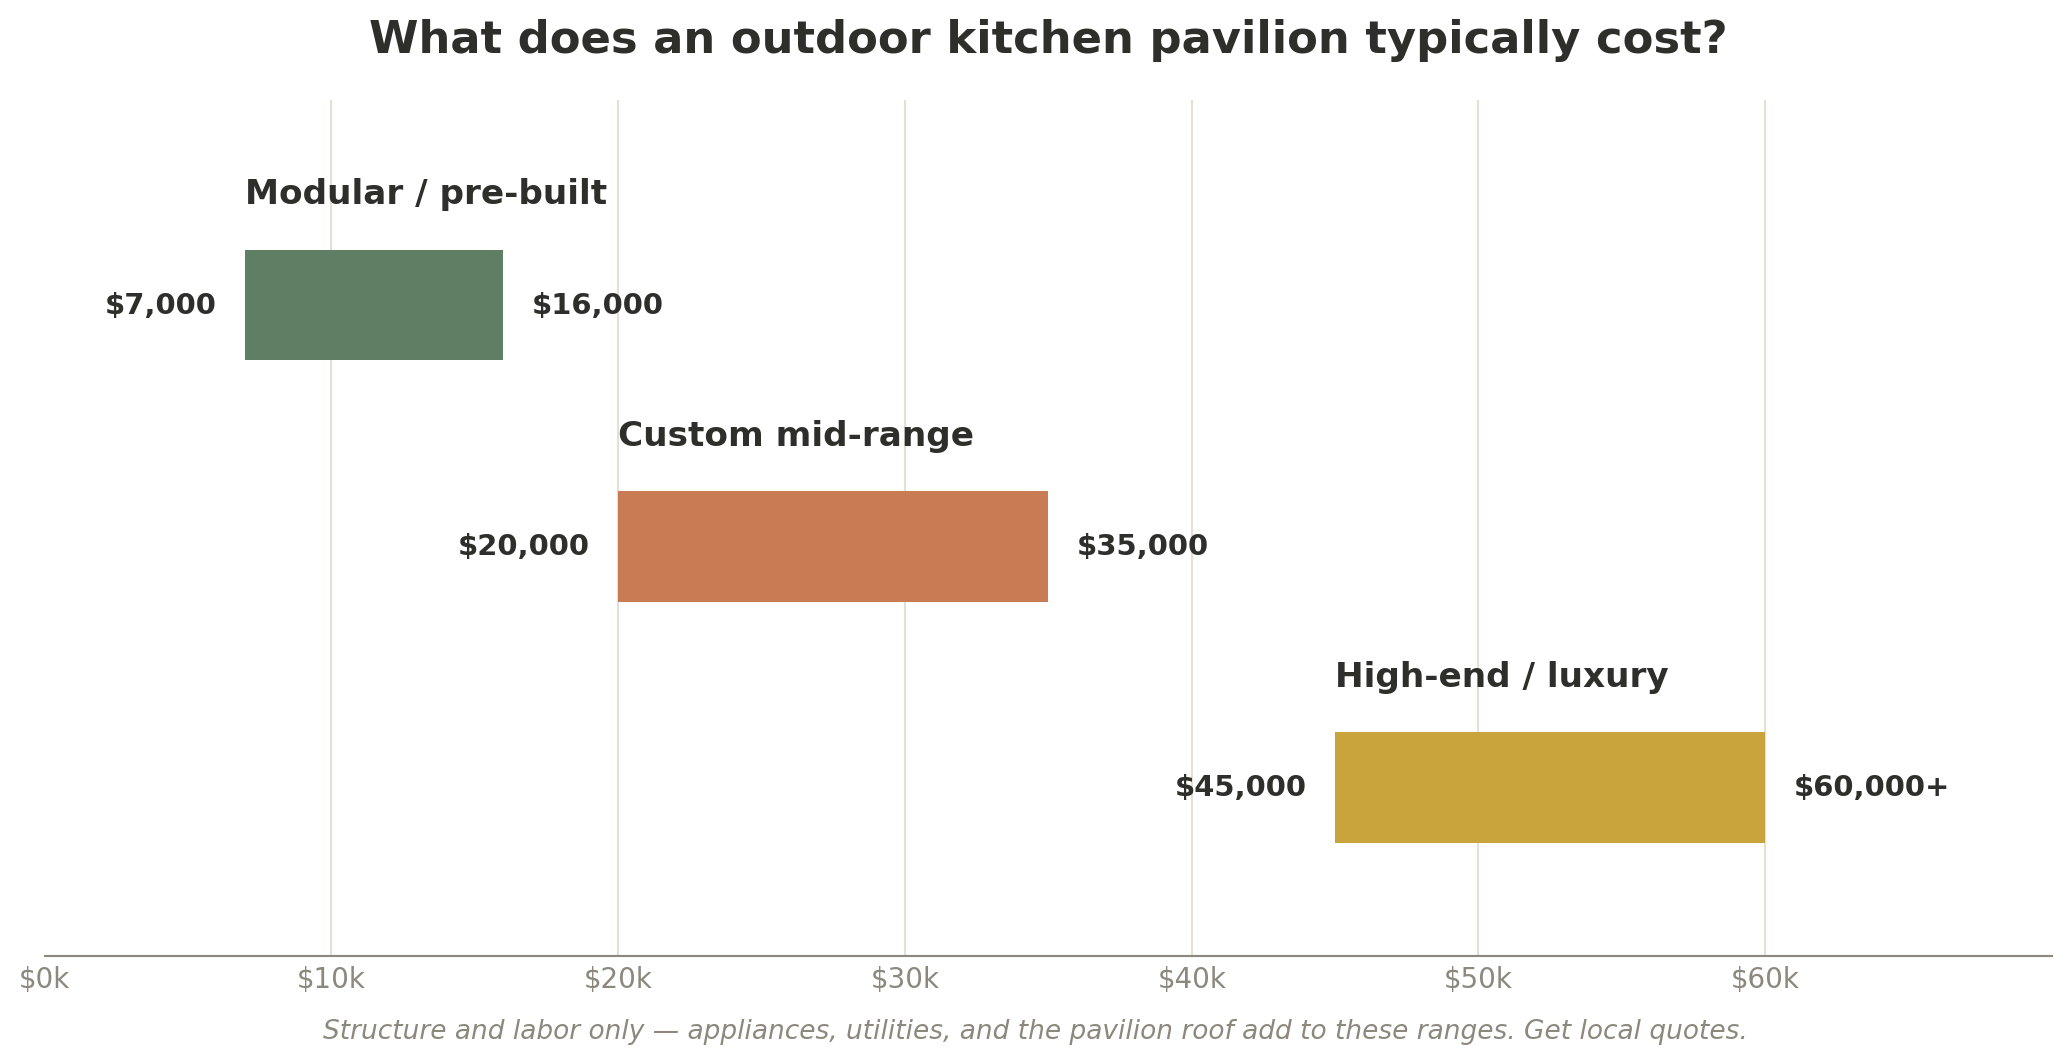
Most cost guides quote a national average of roughly $13,000–$17,000 for the kitchen structure and labor alone — and that figure usually doesn’t include the grill, fridge, sink, or utility hookups. Once you add those in, a fully equipped custom kitchen more commonly lands between $20,000 and $35,000, with luxury builds running $45,000–$60,000 or more depending on appliances and finish level. The pavilion roof itself is a separate cost on top of the kitchen island, since you’re now pricing a timber-frame or steel structure, not just a counter.
A few things that move the number the most:
| Tier | Typical range (structure + labor) | What’s usually included |
|---|---|---|
| Modular / pre-built | $7,000–$16,000 | Pre-fabricated island, basic counter, simple roof |
| Custom mid-range | $20,000–$35,000 | Custom masonry island, mid-grade appliances, timber-frame pavilion |
| High-end / luxury | $45,000–$60,000+ | Premium appliances, natural stone, larger footprint, custom roof details |
- Grill brand and size: a mid-range built-in grill runs $1,500–$5,000; premium brands can run well past $10,000.
- Countertop and veneer material: granite, quartz, and natural stone veneer all carry a wide price range depending on the supplier.
- Utility runs: gas lines, water supply and drain, and electrical for the fridge and lighting add real cost if they’re not already nearby.
Get a few local quotes before you settle on a budget — material and labor costs vary a lot by region, and a contractor who specializes in pavilion kitchens will price the roof and the island together rather than as two disconnected estimates.
Outdoor kitchen pavilion design styles worth considering
A few directions show up again and again in pavilion kitchens, and each one leans on different materials to get there:
- Rustic timber-frame: heavy exposed beams, stone veneer, warm lighting; the most popular look for a reason.
- Modern minimalist: clean steel posts, flat or low-slope roof, large-format porcelain counters.
- Mediterranean: stucco columns, terracotta accents, wrought-iron light fixtures.
Whichever direction you go, keep the pavilion’s roofline proportional to the kitchen footprint below it — an oversized roof on a small island looks like it’s wearing someone else’s coat.
Ready to put a plan on paper? Start with your layout and grill clearance — everything else, from countertop material to lighting, fits around those two decisions far more easily than the other way around.